Becoming Successful Amazon Sellers Requires Preparation
The First Step Starts With Setting Up Your Professional Amazon Seller Account
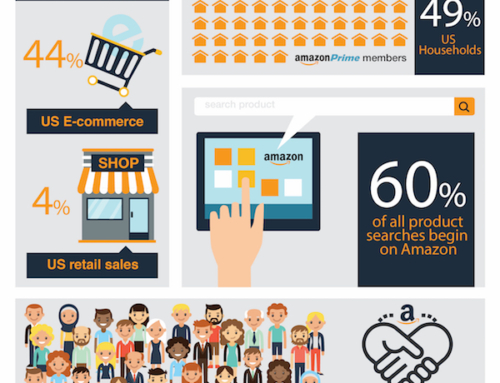
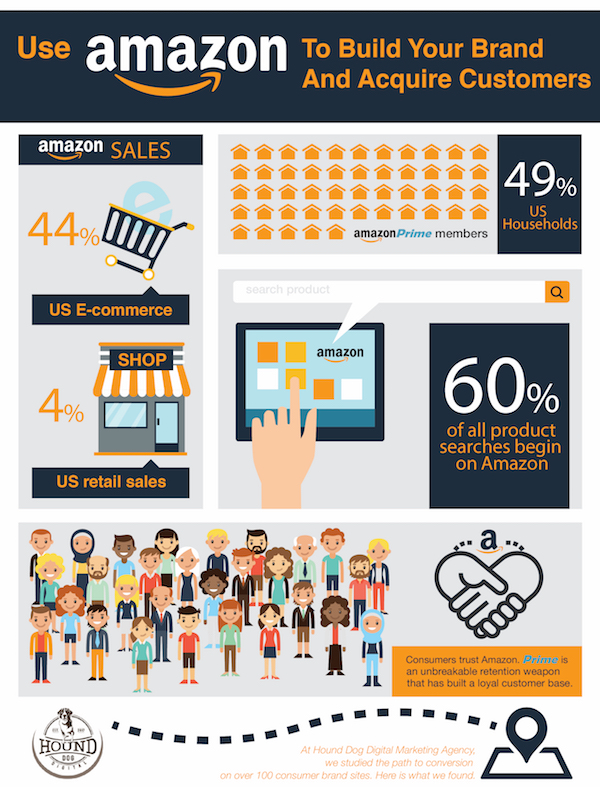
Successful Amazon sellers work very hard to build and grow their business. Amazon is the fastest growing retailer in the world. With 59% of all product searches, you have to be represented on the marketplace or your competitors will. Additionally, the Amazon marketplace accounts for over 50% of all e-commerce sales.
Think about that for a minute.
With the millions of e-commerce sites in existence, Amazon.com accounts for over 50% of all of the sales.
Amazon gets 59% of all product searches and Google gets 30%. That is an astounding number and any retailer who is in the consumer products business should take note. So becoming successful Amazon sellers is a requirement for success today.
Amazon Sellers Advantage
You can look at those statistics and be concerned for the impact on your business. Or you can use the Amazon marketplace to your advantage. Succesful Amazon sellers on the Amazon marketplace account for about 87% of Amazon.com’s sales.
That spells OPPORTUNITY. You need become successful Amazon sellers to use the marketplace to help your business scale.
We push all of our consumer product clients on to Amazon as a new growth channel. This approach has created millions of dollars in incremental sales and profits. Believe me, this is not taking away sales from your existing site. These are new sales and new profit with a lower acquisition cost than you are paying to get sales today.
We are going to lay out the path to becoming successful Amazon sellers by showing you some key steps. The first is setting up a Professional Seller account.
2 Types of Amazon Sellers
There are 2 types of seller accounts: Individual sellers and Professional Sellers.
Individual Sellers pay a $0.99 per transaction and Professional Sellers pay a $39.99 monthly subscription. If you think you are going to sell more than 41 items in a month, its best to set up a professional account.
Professional Seller accounts have access to more tools and features. For example, Volume listing tools, Inventory planning sheets, Selling reports and Sales Tax reports, in addition to many other upgrades. Here is a good summary of the benefits of a Professional Seller Account.
But the biggest SELLING benefit is that you are eligible for the Buy Box. That is important. The buy box is where 83% of all sales on Amazon occur. We will discuss that deeply in another post as we move into selling tricks and tips.
Before you begin the self-service registration process, be sure to have the following information available.
Your business name, address, and contact information
An internationally-chargeable credit card with valid billing address
A phone number where you can be reached during this registration process
Your tax identity information
Your Bank Account Routing Information so Amazon can pay you.
The Amazon Seller Central Setup Process
The guided setup process is simple and straightforward. There are 5 screens that need to be filled out.
The First Screen is pretty basic yet it is important. Once you chose the email that will be used for the administrator, it can never be changed. I generally set up a Gmail account specifically for the purpose of opening an Amazon professional seller account. That way, should someone buy my business, I can easily transfer the administrator credentials with no impact to my other operations.

Amazon Seller Central Setup Step 1
The next screen is for entering the legal name of your business. If you are an LLC, Corp or individual, whichever way you will be filing your taxes.

Setup Step 2
Next, enter your business information. On the third and fourth screen, you will enter your credit card and tax ID information, which must correspond to the legal name of the business you specified previously.

Amazon Seller Business Information Screen
Once these basic setup steps are completed, you will be able to begin setting up your items. But before you do, there are a few other settings that are not so apparent and you should be aware of.
Before You Begin To List Items
Once your professional seller account is set up and before you list your first item, you should check some basic information on your setup. When your account is active, your dashboard will look like this. This is for a new product set I just put on the marketplace about 1 month ago.
The dashboard is a useful tool becoming successful Amazon sellers and growing a business. We will dive deeper into the specifics of each of these other areas in later posts. For now, I want to focus on the top right corner under Settings.

Seller Central Dashboard
When you hover over Settings, you will see this menu drop down.

Seller Central Settings Tab
Before you begin your item setup, it is a good idea to go through your account info and other settings to ensure they are correct. With some of these settings, it is difficult to change them once your items are already set up. In some cases, you will need to re-set the items up again if certain settings on an item are not correct. Believe me, this has happened to me more times than I can mention.
Here are a few of the more critical areas.
Account Info Heading
Although this may seem basic, you should double check to make sure you are set up as the correct form of distribution. FBM or FBA. Make sure you have your Deposit Method set up so you can receive payments every 2 weeks directly. The other critical piece is to set up your Tax Information for sales tax.
You want to have Amazon charge sales tax in the state you have Nexus or where you have a physical presence. Start it from the beginning so you don’t have issues longer term when you begin to scale.
Fulfillment By Amazon
There is one other area that is important to check before you set up your items. The last heading on the drop-down menu is Fulfillment by Amazon.

Fulfilled By Amazon Tab
An important item is determining who is going to label your products if you are an FBA vendor.
Product Labeling
If you are selling a product or brand that anyone else can sell such as Schick Razors, you are going to need to label the items with an FN-SKU so that Amazon knows that it is your product they sold. The decision is whether or not you want to label the items before shipping or if you want Amazon to label the items in their warehouse for a fee.
If you own your brand and you are the only seller of that product, then join the Amazon Brand Registry program so you can control everything to do with that brand. It is a strange world out there and what you don’t want is someone getting a hold of your product and selling it on the platform against you. But with your own brand, you can use the printed UPC and Bar Code you have on your package. If you don’t have a printed UPC and Bar Code on your packages then you will need to label the items in your warehouse or Amazon will label the product for a fee.
Becoming Successful Amazon Sellers
As simple as it sounds, setting up your account correctly, in the beginning, is one of the critical steps for success on the Amazon marketplace. I have a brand that I sell on Amazon and I have had to reset my items up because I missed a few small yet critical steps in the setup process. Taking the time to double check all of your settings before you begin will save you time and frustration in the long run. At Hound Dog Digital, we understand the marketplace and the critical steps. We have added over $4 million in incremental sales for our retail customers this year on the Amazon marketplace.


[…] your goods on Amazon is exceedingly simple, especially if you already have your own e-commerce site set up. All you have to do is register […]
[…] Providers: Amazon FBA, ShipBob, and Easyship offer scalable solutions for global […]
[…] Providers: Amazon FBA, ShipBob, and Easyship offer scalable solutions for global […]
[…] Providers: Amazon FBA, ShipBob, and Easyship offer scalable solutions for global […]
[…] Providers: Amazon FBA, ShipBob, and Easyship offer scalable solutions for global […]